Управление элементами Отправленные
You can manage your sent items for GroupWise email only if the recipient is located on the same GroupWise system as you.
7.6.1 Подтверждение доставки отправленных вами элементов
Evolution provides several ways for you to confirm that your item was delivered. You can easily track message status of any message you have sent. For example, you can see when an email was delivered and when the recipient opened or deleted the email.
You can check the status in the Message Status window of an email you have sent.
Вы можете принимать уведомления когда получатель открывает или удаляет сообщение. Для дополнительной информации смотрите Получение уведомлений об отправленных вами элементах.
You can inform the recipient that you need a reply to an email. Evolution adds a sentence to the item stating that a reply is requested and changes the icon in the recipient's Mailbox to a double arrow. For information, see Requesting a Reply for Items You Send.
- 7.6.1.1. Enabling Status Tracking
- 7.6.1.2. Проверка состояния отправленных элементов
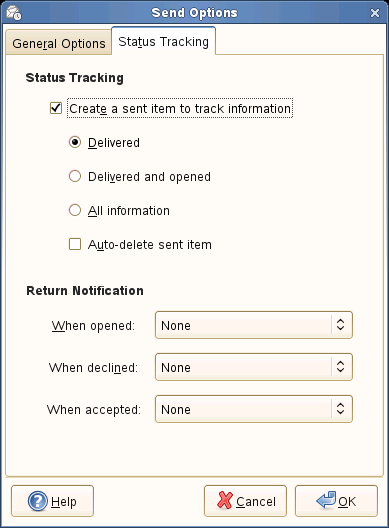
7.6.1.1 Enabling Status Tracking
-
В окне составления сообщений щёлкните Вставить > Параметры отправки.
Select Status Tracking.
-
Select the check box next to Create a sent item to track information.
-
Select any of the options given (Delivered, Delivered and opened, All information)
Based on this selection, you can view the status of the send message in the Sent Items folder.
Для получения дополнительной информации о напоминаниях смотрите Отслеживания состояния элементов.
-
(Optional)Select the check box next to Auto-delete sent item to automatically delete the sent item from the Sent folder.
-
Under Return Notification, specify the type of return receipt you want.
-
Нажмите ОК.

7.6.3 Запрос ответа на отправляемые элементы
-
В окне составления сообщений щёлкните Вставить > Параметры отправки.
-
Щёлкните Ответить на запрос, затем укажите, когда вы хотите получить ответ.
Если вы выберете Когда удобно, затем Ответить на запрос: Когда удобно появляется в верхней части сообщения. Если вы выберете В течение х дней, затем Ответить на запрос: Появятся день, месяц, время дня, время, год в верхней части сообщения.
-
Click Set Expiration Date, then specify the number of days for this message to remain in the recipient's Inbox.
-
Нажмите ОК.

7.6.4 Setting Message Delivery Options
You can delay the delivery of an individual message by having it held in the Outbox for a specified time.
7.6.5 Отображение элементов Отправленные
All sent items reside in this folder unless you select a different folder for sent email in the account editor default settings. For more information, refer to Changing Default Folder for Sent and Draft Items under Default Settings.
7.6.6 Поручение элемента
Каждый контакт получает копию встречи или собрания.
- 7.6.6.1. Enabling Status Tracking
7.6.6.1 Enabling Status Tracking
-
В окне составления сообщений щёлкните Вставить > Параметры отправки > Отслеживание состояния
-
Select the check box next to Create a sent item to track information.
-
Select any of the options given (Delivered, Delivered and opened, All information)
Based on this selection, you can view the status of the send message in the Sent Items folder.
-
(Optional)Select the check box next to Auto-delete sent item to automatically delete the sent item from the Sent folder.
-
Under Return Notification, specify the type of return receipt you want.
-
Нажмите ОК.